Today I am sharing all of the DIY home projects we were able to tackle this past year!
This post contains affiliate links. For my full disclosure, click here.
Happy New Year friends! As I reflect on this past year, I can’t help but feel immense gratitude to all of you who follow along here and my other platforms. Without you, this blog would not be possible! I am also so thankful to God for His many blessings this past year, and when I think back on all of the DIY home projects we were able to complete, I know we could not have done so without His provision. All glory be to God!

This year we were able to tackle so many DIY projects. I can hardly believe it! We were able to complete so many home improvement projects that have been on my to-do list for years. From hardwood floors in the kitchen, to a total basement refresh, to an outdoor space upgrade, 2024 was truly a labor of love. While we are by no means professionals, I am so pleased with the final results of all of the upgrades we were able to make this past year.

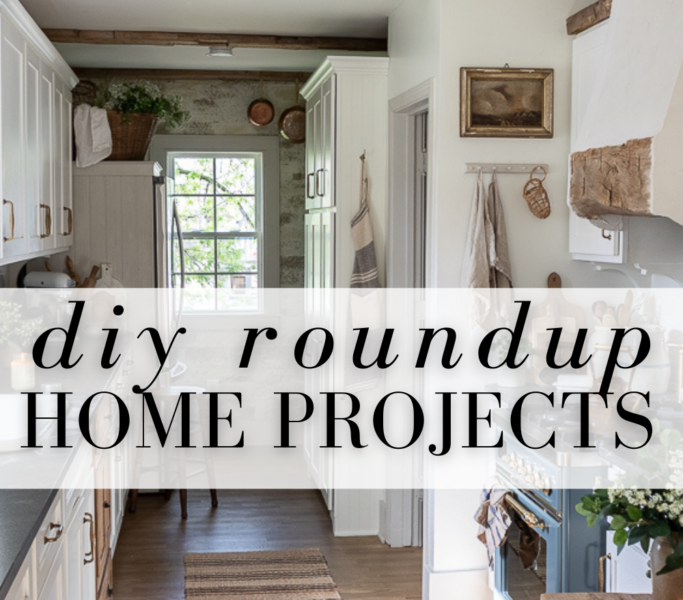
Probably the biggest area we focused on this past year was our kitchen space. When we moved into our little fixer-upper over 10 years ago, the kitchen was actually in pretty good condition! The previous owner had installed all new cabinetry and tile flooring. While it wasn’t exactly my style, the kitchen was a useable, updated space that was not on our top priority (or in our budget haha) to fix.
DIY Home Projects: Honed Granite Countertops
After many years of updating nearly every room in our home, we finally were able to set our focus on the kitchen. The first project we tackled was installing honed granite countertops! While my old black Corian countertops weren’t horrible, they were starting to show some wear and tear and the high gloss finish didn’t really fit the cottage style I was trying to achieve in my kitchen. Plus, the reflection of the polished surfaces showed every little imperfection.

I loved the look of soapstone countertops; however, they were definitely out of our price range and also scratch easily. After some research, we landed on honed granite and I am so happy with the look and finish of these countertops in my cottage style kitchen! They achieve the timeless look of stone, while being an affordable and durable option.

DIY Home Projects: Red Oak Hardwood Flooring
After the new counters were installed, I already knew the next project I wanted to dive into! The honed granite clashed a little with the slate tile that had been installed by the previous owner, so I knew I needed to bring in some warmth with a new floor. Our 1930’s home thankfully still had it’s original, beautiful red oak hardwood flooring, and bringing that into our kitchen would achieve the look I was hoping for.

Removing the tile was definitely a lot of work. Dealing with slate or cement board can be challenging, requiring tools like a crowbar and sawzall for removal. My husband really helped me out, removing the old flooring for me over a period of several days. Together we worked to get the space clean and ready for install.
Installing the actual red oak hardwood flooring wasn’t too difficult. We rented a flooring nailer, and purchased a hand sander and a rubber mallet. Once the flooring was installed, we chose a stain with green undertones for our red oak flooring – a combination of Aged Wheat by Varathane lightened by 50% with Mineral Spirits. Finding stain for your flooring can be quite the process, I definitely recommend getting sample stain to try first to see how it looks applied.
After staining and sealing, we lightly sanded the surface once more before applying a final coat of sealer. This was truly an incredible change in our kitchen. Solid wood floors are definitely a lot of work if you aren’t using a contractor or carpenter, but DIY saves so much as homeowners. The flooring looks so beautiful combined with the honed granite countertops and my stone accent wall.
DIY Home Projects: Kitchen Vent Hood
The new flooring and countertops really transformed my kitchen into a beautiful, English cottage inspired haven. I spend so much of my day in the kitchen that brining my vision to life was such a much needed and wonderful renovation for me. After replacing our white kitchen cabinet handles and knobs with beautiful vintage bronze pulls, there was one last fun DIY project to complete.
The last change I wanted to make was updating my vent hood. This was the perfect project for us, as we already had the materials on hand and didn’t need to purchase anything in the process! Using some beadboard we already had, we were able to attach the boards to the existing reclaimed wood beam that was over my stove. I added some corbels to the sides to cover the exposed lumber and add a nice finish.
We then primed it all so that the mud that I used would have something to grab onto. The primer we used is Zinsser Bullseye 123. We love this primer and have used it so many times. After we primed, I just used some joint compound that, again, we already had in our basement. I took a putty knife and spread it all over the hood very randomly. I kinda wanted a rustic finish and didn’t want anything super smooth looking; I wanted it to look a little bit older.
I ended up liking the color and finish of the joint compound, so we didn’t end up needing a fresh coat of paint. I just love how it turned out! The vent hood has a built-in look that makes it appear to be original to the home. It truly brings in that vintage, cottage feel to my kitchen. You can read the full tutorial here!